

In Door Grow Lights For Gardening
I have a degree in ancient history and a passion for reading, cooking, DIY projects, tea, science fiction, and a myriad of other subjects.
Christy K.
There are lots of instructions that claim you need all sorts of ingredients to make a proper bottle garden. Sand, activated charcoal, gravel, and cheesecloth are a few commonly recommended items from other tutorials. Feel free to try those if you want to get fancy, but my version is extremely basic and doesn't require the purchase of any materials you can't find at home for free.
Don't worry, from my experience with this method, your bottle garden will still look beautiful and flourish without any of the extra stuff.
What Is a Bottle Garden?
A bottle garden is exactly what it sounds like: a tiny, self-sustained garden sealed in a bottle or jar. It's basically a tiny terrarium. So, why would anyone want to grow a garden in a bottle? There are several characteristics that make a bottle garden fun to own and awesome to create.
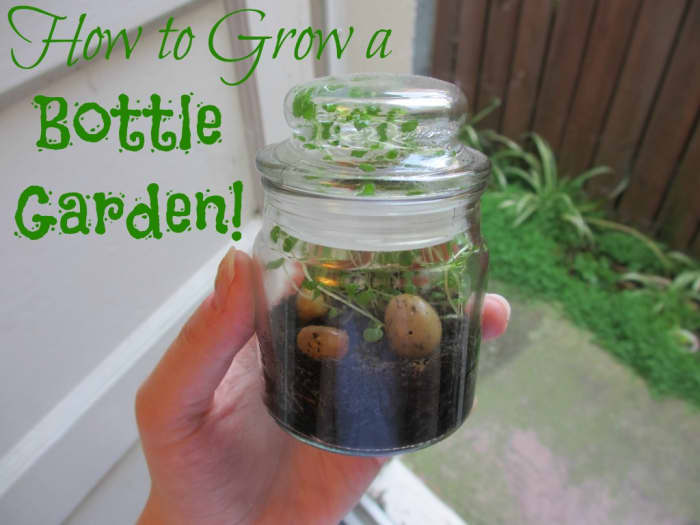
My first bottle garden, sealed for 3 months and counting. Look how much it's grown!
Christy K.
My first bottle garden, the same day I made it.
Christy K.
Materials You'll Need
Here's what you need to get started.
- One clear glass bottle or jar. You can also use a clear plastic bottle, but I think it looks much classier with glass.
- Soil. You can use purchased potting soil or natural soil from a garden or park (if you don't have a lawn or garden). Either works fine, and you won't need much.
- A small plant. Choose a type of plant that stays very small or grows very slowly. Groundcover plants are a good choice. I use angel's tears (Soleirolia) because they're small, low-growing, and abundant where I live, so it was easy to get some.
- One pencil or chopstick.
Optional:
- Coffee grounds. Cooled coffee grounds are good to mix with your soil because they help retain moisture.
- Tiny bits of compost. I add a layer of chopped-up compost bits to the very bottom of my bottle gardens for fertilizer.
- Decorative items. I add shiny pebbles to my bottle gardens to make them more attractive. Consider adding a pretty stone, a marble, a bit of glitter, or other decoration for fun.
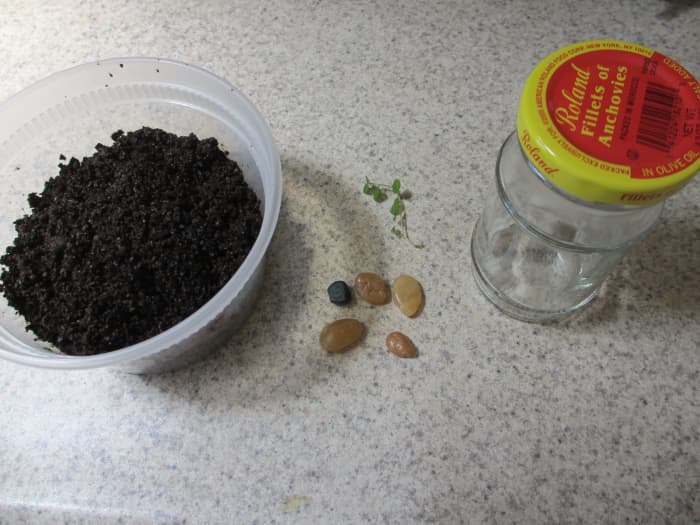
Some of my materials for making a bottle garden.
Christy K.
How to Make a Bottle Garden
- Thoroughly clean your bottle or jar. Make sure there are no bits of food or greasy residue stuck inside. Completely remove any outside labels, including scrubbing off the adhesive gunk.
- (OPTIONAL) Chop up your compost. If you're not adding compost, skip this step. If you are, chop it up into tiny pieces and add them to the bottom of your jar. I used a bit of lemon peel.
- (OPTIONAL) Mix coffee grounds with your soil. If you're not adding coffee grounds, skip this step. If you are using coffee grounds, cool them first and mix them with your soil at a ratio of half and half.
- Moisten your soil. Add water to your soil or soil/grounds mixture until it is moist but not soggy.
- Add soil to your jar. Spoon the moist soil in carefully. Fill the bottle or jar about 1/3 full of soil. If you used compost, the soil should completely cover it.
- Arrange the soil. Use the back end of your chopstick or pencil to break apart clumps and gently level out the soil. You can also use your instrument to push off any soil bits that are stuck to the sides of your bottle or jar.
- Poke a small hole with the pointy end of your pencil or chopstick. It should be shallow.
- Add your plant. If your plant is a cutting without any visible roots yet, simply place its base in the small hole to keep it in place. If your plant has roots, place the roots in the hole and use your pencil or chopstick to gently push soil over them.
- Add water. Do not put the jar directly under the tap. It's very easy to accidentally add way too much water (which means you'd have to start over). You want the soil to be very moist, but not waterlogged. The easiest way I've found to add just the right amount of water is to hold your hand under the tap and then let the water drip from your fingers into the jar.
- (OPTIONAL) Add decorations. If you're not adding decorations, skip this step. If you are, be sure to use only small items so your plant will have plenty of room to grow.
- Seal your bottle garden. Put the lid on tightly and place it in an area that gets some sunlight.
When your bottle garden is done, you shouldn't need to give it much additional care. Just water it once every 4-6 months. My first bottle garden has been sealed for three months and counting, and it's flourishing nicely without any additional effort on my part.
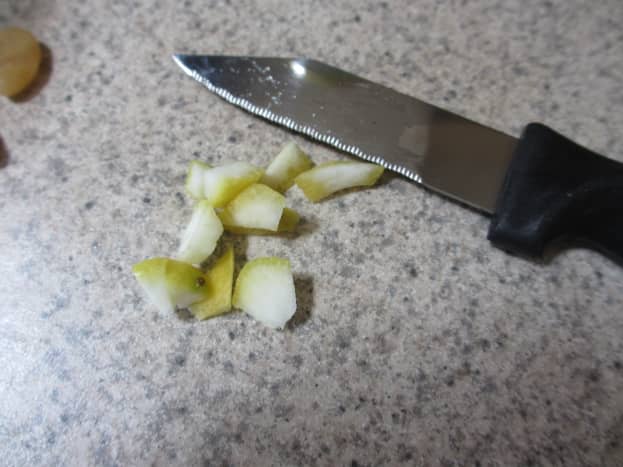
If you're using compost, chop it into tiny bits and add to the bottom of your jar.
Why Make a Bottle Garden?
- Bottle gardens can be made entirely out of recycled household materials.
- They are easy to make and fun to design. It's a great project for kids both in the classroom and at home.
- Bottle gardens are extremely low-maintenance. In fact, once your bottle garden gets started, it will only need watered 2-3 times a year.
- They are an attractive and unique décor item for your office, dorm room, apartment, or anywhere else that gets a little sunlight.
- Bottle gardens are a great way to bring some greenery to spaces without room for a real, outdoor lawn or garden.
- It's a delight to watch your bottle garden grow.
- They make thoughtful and eco-friendly gifts.
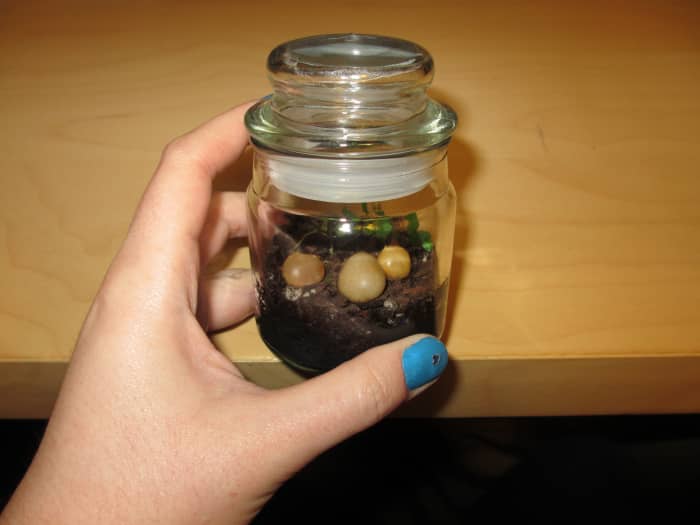
My Bottle Garden: Day 1
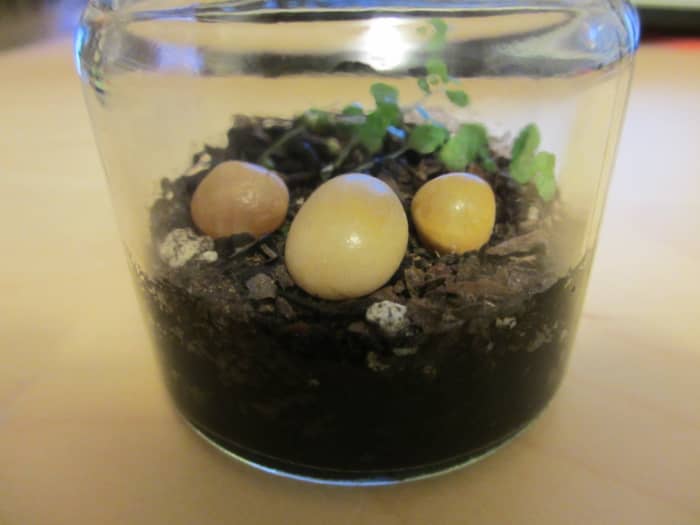
Here's what my first bottle garden looked like the day I made it.
Christy K.
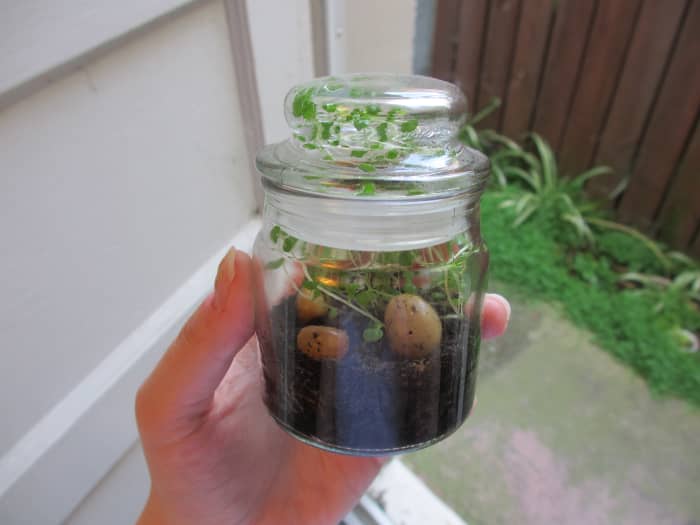
Month 3
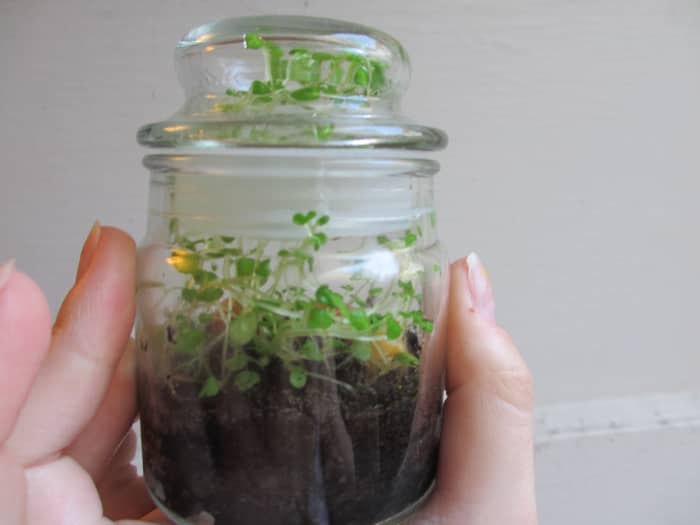
Here's my first bottle garden 3 months later. It has remained sealed the whole time and it's growing happily.
Christy K.
5 Months
It has been five months, and my bottle garden was starting to look a little scraggly and brown. I broke the seal to give it a bit of water before closing it up again.
Check Out One Man's 40-Year-Old Bottle Garden
- Sealed Bottle Garden Thriving After 40 Years without Fresh Air or Water
Gardener David Latimer, from Cranleigh, Surrey, first planted his bottle garden in 1960 and finally sealed it tightly shut 12 years later as an experiment, and it's still going strong!
- Fancy Indoor Terrarium How-To
If you DO want something a bit more complicated and fancy, here's a great resource. The results are beautiful, but it requires the purchase of many extra ingredients and supplies. Keep reading my guide to make a simpler one for free.
This content is accurate and true to the best of the author's knowledge and is not meant to substitute for formal and individualized advice from a qualified professional.
James Charles on February 11, 2020:
Hi sisters, this was especially a good project because I liked the look of my plants. Thanks to the author
Hhh on February 11, 2020:
It is not nice
Henry on February 05, 2020:
It works
Brandon Lobo on February 13, 2017:
Hey Christy, great article. I personally love gardening and ever since I moved to Germany as a student, I don't have a personal garden. I could go out into the city into a community garden, but it's not the same as having your own garden by your home.
Yesterday, was when I decided I should try a bottle garden and I began looking up stuff on Youtube and I thought I should document and write a hub about it one day, but then I found this :) Is your bottle garden still up? And if it is, how did they get along through winter?
Kara Skinner from Maine on February 23, 2015:
This is so cool! I can't wait to try it myself as soon as I can actually get soil from the ground again.
Marie from Canada on May 28, 2014:
What a great idea. I will definitely give this a go! Thumbs up!
Kenneth Avery from Hamilton, Alabama on April 25, 2014:
Hi, Christy ,
I really enjoyed this fantastic hub. It was well-written. Loved the lay-out and use of graphics. I couldn't vote any other way but Up and all of the buttons. I loved this idea. Great job of illustrating the Bottle Garden.
You have a wonderful gift for writing. I admire you for the job that you do.
I am going now to leave you some fan mail that I want you to read. Then I am going to follow you. I simply ask that you look at two or three of my offerings and be one of my followers.
Thank you sincerely.
Kenneth, from northwest Alabama.
Sharon from Perth on April 12, 2014:
Great idea for kids to try, and it would not take up much space either
kerlund74 from Sweden on February 21, 2014:
Sounds like really fun acitivity to do with my kids:)
Cathi Sutton on February 12, 2014:
So cute! What a great idea as gift, or for a kid's project, or just because my green thumb is tingling! Loved this!!
Thelma Alberts from Germany on February 03, 2014:
Wow! My father will say I´m crazy again when he see me doing it. I would love to grow a bottle garden. Thanks for sharing your awesome idea. I love it.
Eiddwen from Wales on January 28, 2014:
What a great hub ; I have always wanted a bottle garden and I shall certainly be giving it a try. Thanks for sharing and voted up.
Eddy.
Christy Kirwan (author) from San Francisco on January 16, 2014:
Thanks for the kind words, Sally and Bill! I'm so glad you enjoyed this project!
Bill Holland from Olympia, WA on January 16, 2014:
I love cool ideas like this. What a great project this would be for kids. I see we share a lot of the same followers, all quality people and writers. I guess I better follow you too. :)
Sally Gulbrandsen from Norfolk on January 16, 2014:
Christy Kirwan - what a nice idea - a little bottle garden would make a great gift for someone.
Christy Kirwan (author) from San Francisco on January 15, 2014:
It should! Mine is doing just fine and I only open it every 3 months or so. :)
Bryce on January 15, 2014:
I'm doing a project for bio do u think this will last a couple of months in opened
Eileen Gamboa from West Palm Beach on December 17, 2013:
Oh so pretty. I do not have a green thumb, so I love the low maintenance!
RTalloni on November 08, 2013:
Thanks--looking forward to finding the perfect containers for my grandchildren's homes. Just reviewed your directions and saw the link to the video (duh) on that long-term bottle garden. It's amazing. :)
joaniebaby on November 07, 2013:
What a great idea. Can't wait to try one myself. I don't have room in my house for plants but I think I can find a spot for one of these. Voted up, awesome and useful. Thanks so much.
Rebecca Mealey from Northeastern Georgia, USA on November 07, 2013:
Awesome! I like the way you added the compost. that is a new one on me. Shared, pinned!
Christy Kirwan (author) from San Francisco on November 07, 2013:
@RTalloni I keep mine on a windowsill. That side of the house doesn't get a lot of direct sunlight, but it gets natural light all day. I think it depends on the type of plant you're growing as well.
Christy Kirwan (author) from San Francisco on November 07, 2013:
Thanks, everyone for your kind comments! My bottle garden is still alive and well-- it's been about 8 months so far. :)
CraftytotheCore on November 07, 2013:
I love this! How fantastic! My daughter loves plants. But every time I buy her one, the cat eats the flowers or leaves off of it even when we put it up high. I am totally going to do this with her. That way she can have a little garden on her windowsill. I still have seeds left over from summer. Thank you so much for this brilliant idea!
Kathryn from Windsor, Connecticut on November 07, 2013:
This would be a cool project to try! I love plants, but have never tried to grow any small ones in a jar before.
Thanks for sharing this with us, including your 5 month update (that's always helpful), and have a great day!
~ Kathryn
RTalloni on November 07, 2013:
Yes, for my grandchildren! (Had to put it here :) because it isn't in the voting list above.)
I recently read about a very old closed bottle garden--England, I think. Now that I have your directions I believe I'll have to make this a winter project. I love them because they display the power plants contain!
It looks like you have a bit of root on your plant, not just a cutting, but can you tell me more about light. Do you keep in a sunny window, or near one on a table, and how much sun, just a few hours, or all day sun? I'm thinking of starting with a dwarf thyme.
lafamillia from Soutcentral Europe on October 23, 2013:
Fun and creative just as Bishop55 said.
Rebecca from USA on October 22, 2013:
This is fun and creative! Voted up and sharing!
Rochelle Frank from California Gold Country on October 10, 2013:
My granddaughter likes to grow things. I'll bet she might like to try this. Thanks.
Brian Prickril from Savannah, GA on September 25, 2013:
Fun! I'm already thinking of tiny "snow globe" type characters to add to mine. Thanks!
Christy Kirwan (author) from San Francisco on August 08, 2013:
Thanks so much for the comments. I hope everyone has a great time trying this project! Thanks for reading. :)
Christine from Dublin on June 25, 2013:
What a great idea. I have just moved into an apartment after living with a garden for 11 years. I loved my garden and miss it so this would be a great idea.
I'm going to give it a try. I will let you know how it goes.
Thank you for sharing this idea with us.
Garlic Angel Pinned and Bookmarked :-)
livingsta from United Kingdom on May 29, 2013:
This is very beautiful and interesting. Enjoyed reading this and this is the first time I am coming across a bottle garden. Definitely worth a try. Thank you for sharing this with us.
Mary Craig from New York on May 07, 2013:
I'm loving this! I'm a gardener at heart and my outside gardens are beautiful but woe be any plant that enters my house! Then I turn into a plant killer....this is perfect for me. Your instructions are easy to follow and I love how good your bottle garden looks.
Voted up, useful, and interersting.
Chitrangada Sharan from New Delhi, India on May 05, 2013:
This is so interesting! I love gardening, whether growing plants indoors or outdoors. And this is worth giving a try.
Thanks so much for sharing!
Christin Sander from Midwest on May 05, 2013:
How cute! I love these and I think the kids would like them too. We'll definitely give them a try.
Rebecca Mealey from Northeastern Georgia, USA on May 05, 2013:
This is just about the coolest thing ever. I want to make one. Voted awesome and shared!
Christy Kirwan (author) from San Francisco on May 05, 2013:
Awesome, pstraubie48! I'm sure it will turn out beautiful. :)
Patricia Scott from North Central Florida on May 05, 2013:
How clever this is. I have bookmarked it as I love to grow all kinds of things and definitely will be giving this a try.
Angels are on the way shared :) ps
In Door Grow Lights For Gardening
Source: https://dengarden.com/gardening/How-to-Grow-a-Bottle-Garden
Posted by: johnsonrone1968.blogspot.com
0 Response to "In Door Grow Lights For Gardening"
Post a Comment