

Better Homes And Gardens Scented Wax Warmer Replacement Warmer Lid
Wax melts and tarts have recently been seen moving into major retail stores. However, not everyone is familiar with this candle alternative, leaving customers asking, "How do you use wax melts?"
Candles are great for their smell and their ambiance; however, there are times when you don't want to keep track of the flame or having to trim the wick. Wax melts, cubes, and tarts are meltable wax chunks that are warmed to release scent. Wax melts are scented bite-sized chunks of wax that are a flame-free, convenient way to fragrance your home! Wax melts are placed in a wax warmer, and melted with the wax warmer which usually has a ceramic heater or light bulb included with the warmer. To make this process easy, we have broken it down into a few simple steps.

#1. Find a Wax Melt or Tart Warmer
Using wax melts, tarts, or cubes requires a wax warmer. Wax melt or tart warmers come in a variety of shapes, styles, and designs. It's imperative to use a wax warmer or burner specifically designed for wax melts, because any other type of warmer can reach temperatures much higher than designed for your wax melts, and this will quickly burn out your scent. It can also be dangerous to use a melter or burner that is not designed for wax melting.

Wax Warmer Designed for Wax Melts, Tarts & Cubes
#2. Read the Instructions
Open the packaging of your wax warmer and read the instructions and safety information that came with your new warmer. This is to ensure that you get the best use out of your wax melts, cubes, or tarts. Some wax warmers use a light bulb to melt the wax, while other wax warmers use a ceramic heater that is built-in the warmer. If you have an electric warmer that comes with a light bulb, make sure to remove the plastic from around the bulb before you start melting. Wipe down the top of your wax warmer, or if you're using a wax warmer liner, place the liner on top of your wax warmer. If the pieces of your wax warmer are separate, set the bowl atop the base. If you're using a wax warmer with a silicone dish, you do not need to put an additional wax liner or popper inside the dish!

Wax Warmers With A Built In Silicone Dish
#3. Choose your Wax Melts, Place a Wax Melt Inside the Warmer
To use your wax melts, cubes, or tarts, you need to check to see whether your wax is already broken apart into smaller sizes. If your wax melts come in the form of wax cubes, break off a piece (approximately 1 oz) and place it inside the warmer. For wax cubes, try not to use more than one melt at a time. If you are using smaller melts or Happy Wax wax melt bears, you can use 2–3 bears depending on your desired fragrance intensity. Once you have placed the wax melts in the burner, do not add water or oil to your wax melts.

Place Wax Melt or Cube in Wax Warmer
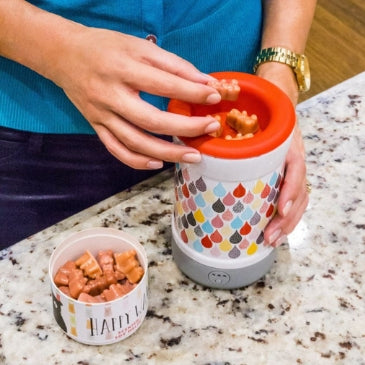
For a More Saturated Scent, Use 2–3 Wax Melt Bears
#4. Turn on Your Warmer
To begin using your scented wax melts, cubes, or tarts, you will first need to turn your wax warmer on. If you have an electric warmer, find a safe space to begin your warming process and plug the electric warmer into any electrical outlet. Do not allow the cord to hang over the edge of a table or counter, and make sure the cord is not in contact with any hot surfaces. Press the "on" switch to activate your warmer, or follow the instructions that came with your warmer. If your warmer doesn't have a timer, you will need to make sure you set an additional alarm or timer to keep track of how much wax you are using; you may also want to watch your warmer carefully, as some wax tends to overflow. If you have a wax melt warmer with a built-in timer, go ahead and set the timer to your desired time. Make sure not to move your warmer when it is holding a container of hot wax. Once you have turned your warmer "On" the wax will begin to melt and your room will be filled with fragrance!

Wax Warmer With a 3-6-9 Hour Auto Shut Off Timer
#5. Turn the Wax Warmer Off
Once you are done using your scented wax melts, cubes, or tarts, you will need to make sure your wax warmer is turned off, especially if you don't have a wax warmer with a built-in timer. After you have switched your warmer to its "off" setting, disconnect it from the wall by gripping the plug from its base; never pull the cord to disconnect. Wait for the wax to get cold and solidify before removing the used wax from your warmer (for more info on changing out your wax, click here).

Wax Warmer With An Auto Shut Off Timer
#6. Remove Your Wax
Once the wax has cooled, you will either need to scrape the wax out of your melting dish, discard the liner, or—if you have a warmer with a silicone dish—gently nudge your dish from behind to pop the wax out! Just be sure not to discard used wax down the drain. To clean your wax warmer, take a paper towel and wipe down the area where you inserted the wax. For an easy clean, you can use a drop of baby oil. You can also use a warm, moist, soapy sponge or soft cloth to clean the dish inside. Wipe down with a soft cloth. Never use abrasive cleaners that can cause wear and tear to your wax warmers. For more tips on removing wax, click here!
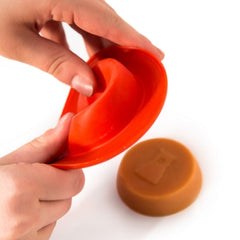
Easily change scents with wax warmers that include Silicone Dish
#7. You Can Reuse Your Scented Wax Cubes, Tarts, or Melts
Melted wax does not evaporate; only the scent dissipates, so make sure to remove the used wax from your warmer before adding a new cube If using Happy Wax melts, 2-3 wax melts generally yield about 8 hours of fragrance. You are welcome to reuse the wax as many times as you want until the fragrance dissipates. If the scent has faded and you want to make the most of your wax, you can reuse the wax in a plethora of environmentally friendly ways! Happy Wax soy wax melts are even biodegradable.
Check Out Easy To Use Wax Melt Starter Kits!
Better Homes And Gardens Scented Wax Warmer Replacement Warmer Lid
Source: https://happywax.com/blogs/from-the-blog/how-to-use-scented-wax-melts-cubes-tarts
Posted by: johnsonrone1968.blogspot.com
0 Response to "Better Homes And Gardens Scented Wax Warmer Replacement Warmer Lid"
Post a Comment